Contributing to Exosphere
Exosphere has a lighter-weight process for new contributors. If you're making your first or second contribution to Exosphere, you only need the Quick Start section below. Otherwise, please see the Core Contributor Onboarding section.
See Contributor skills for the skills you need (or will learn!) while working on different parts of the project.
Quick Start for New Contributors
New contributors, please check with a project maintainer before attempting to solve an issue of weight 5 or higher.
This assumes familiarity with a git-based contribution workflow on platforms like GitHub. If you have never done that, or you are stuck for any other reason, ask for guidance in our chat. We're happy to help.
Exosphere is hosted on gitlab.com, a service that is similar to GitHub in many ways. One difference is that a code contribution on GitLab is called a merge request (MR) instead of a pull request (PR), but the concept and workflow is exactly the same.
- Create an account on gitlab.com, unless you have one already.
- Create your own fork of exosphere/exosphere.
- Clone your fork locally.
git clone https://gitlab.com/your-gitlab-username/exosphere
- Compile and run the app on your computer; see Running Exosphere For Development Work.
- Optional but helpful step: configure your editor to run
elm-format
whenever you save a file. Save.elm
files often to automatically apply code formatting.
- Optional but helpful step: configure your editor to run
- Make your code changes, compile the app again, and confirm that your changes work.
- Ask in chat if you need a set of credentials to test the app against a real OpenStack cloud.
- When you're satisfied with your changes, create a new branch, make a commit, and push the commit(s) to your origin on GitLab.
git switch -c upside-down-support
git add *
git commit -m 'add a setting to display the entire app upside down'
git push -u origin upside-down-support
- Browse to the URL in the output of your
git push
command to create a Merge Request.- Target this MR at the
master
branch of the upstream project (exosphere/exosphere
). - Fill out the MR description template.
- A maintainer will review your MR and respond if we need anything else from you.
- Target this MR at the
- If you need to make more changes, continue committing and pushing them. Your merge request will update on each
git push
.
Issue Triage Process
Who and When
Project maintainers alternate triage duty, based on the day an issue was submitted. @julianpistorius triages issues submitted on odd days, and @cmart triages issues submitted on even days. If a maintainer is on a vacation that is entered into the Exosphere collaborator calendar, the other maintainer triages issues submitted on those vacation days. The exception to this is if a maintainer is also the submitter of an issue -- the maintainer self-triages regardless of the day.
The designated maintainer should triage an issue within two working days of its creation. Issue submitters are welcome to self-triage to the extent that they can. In that case, the maintainer's job is only to ensure the triage process was applied correctly.
If the issue is not well-specified enough for a maintainer to triage it, they should assign it to the submitter and ask them to clarify as needed. If the submitter does not provide adequate clarification within 14 calendar days, the maintainer should close the issue.
Deduplication
Ensure the new issue does not substantially duplicate any existing open issue. If it does, decide which issue to close.
Your default choice should be to close the new issue unless (1) the new issue is a better description of the same problem, and (2) the existing issue does not contain much discussion or linked work.
Whichever you decide, close it with a comment to the effect of "Closing as duplicate of #XXX, please use that issue and update it as needed.", where XXX is the issue left open.
Resolving Disagreements
If a maintainer disagrees with how another maintainer applied the triage process, they should work with the person who triaged the issue to reach agreement.
Quick Triage Checklist
- Description is adequately populated
- Weight is set
- Appropriate labels are applied, including type, severity and priority
Detailed Triage Checklist
Description
Ensure the description template was followed.
Ensure that it describes only one problem. A list of unrelated problems deserves a separate issue for each one.
Weight
Set the weight to estimate the complexity or the amount of work required to solve the issue. It is only loosely coupled with implementation time for a solution.
Weight is a linear scale so that it's meaningful to sum the weights of issues.
- 1 is a "good first issue". An experienced contributor can solve this quickly, with trivial design work. Example: changing some text in the UI.
- 2 is a "good second issue".
- 5 is a "good second issue" for an ambitious new contributor. It may require familiarity with the layout of the codebase.
- 10 may require the contributor to have context of the problem domain, including figuring out something with OpenStack. The solution may require collaborative design or scoping work between the contributor, maintainers, and possibly the issue submitter.
- 20 example: adding a new page with new functionality. May require a combination of instance configuration (Ansible) and front-end (Elm) work.
- 40 example: adding a mid-sized new feature which may involve multiple pages in the app.
- 80 example: adding a large or complex new feature
- 160 The solution requires exploratory work, planning, consensus, and implementation in phases. Example: Rewriting a large fundamental part of Exosphere, which might lead to many hard problems to solve.
If something is very large, it should probably be split up in multiple issues or chunks. You can simply omit the weight of the parent issue and set weights to child issues.
Labels
Among the prioritized labels (those starting with a capital letter), select those that apply to the issue. See the label description for an explanation of each.
Label: Type
Set the type label according to the sort of issue. The urge to set multiple types for an issue suggests that that one should split it into multiple issues.
- Bug: the app doesn't work as advertised.
- Feature: opportunity for the app to do something new, or make an existing feature bigger or better.
- Maintenance: technical debt, documentation, or project management.
Label: Severity
Set the severity label to communicate the impact of an issue to the people affected.
Issue severity applies only to "Bug" and "Maintenance" type issues. Severity should not be set for "Feature" issues.
- Blocker
- ~Bug: Broken feature with data loss, or no workaround.
- ~UI/UX ~Bug: User would say "I can't figure this out, likely to make risky errors, or ask for support."
- ~Maintenance: Blocks development (e.g. broken CI/CD), or has turned away contributors.
- Critical
- ~Bug: Broken feature with an unacceptably complex workaround.
- ~UI/UX ~Bug: User would say "This workaround is painful or it significantly delays me."
- ~Maintenance: Causes unacceptable friction to development, or confusion that is unlikely to be resolved by studying docs or code.
- Major
- ~Bug: Broken feature with a workaround.
- ~UI/UX ~Bug: User would say "This still works, but I have to make changes to my process."
- ~Maintenance: Causes confusion that is likely to be resolved by studying docs or code.
- Low
- ~Bug: Functionality is inconvenient.
- ~UI/UX ~Bug: User would say "There is a small inconvenience, inconsistency, or cosmetic issue."
- ~Maintenance: Causes some annoyance to contributors.
Label: Priority
Set the priority label to indicate the importance and guide the scheduling of the issue. We determine priority based on the project direction, the number of impacted users and capacity of the team.
Unless you have a good reason to set priority 1 through 3, set priority 4. If you are unsure, consult co-maintainer(s).
- Urgent: We will address this as soon as possible regardless of the limit on our team capacity, and discuss it at every weekly meeting.
- High: We will address this soon, will provide capacity from our team for it, and discuss it at least once per month.
- Medium: We want to address this but may have other higher priority items. No timeline designated.
- Low: We don't know when this will be addressed. No timeline designated.
Label: "Triaged"
Finally, apply the "Triaged" label to indicate completion of the triage process.
Core Contributor Onboarding
Feel empowered to ignore this section until making your third or subsequent contribution to Exosphere.
Development Environment Setup
In addition to Running Exosphere For Development Work, we recommend that you set up the following.
elm-format
on save- configure your editor to apply code formatting whenever you save a file.
- If you save files often, you save yourself a lot of typing and indenting work.
- Similarly, if you find yourself editing
js
,json
, orhtml
files, you can enable Prettier integration to automatically format those.
pre-commit
for verifying your commitspre-commit
is a utility for managing git hooks. We use it to run tests, format tools, and code analysis tools.- Install
pre-commit
- Run
npm install
andnpm run prepare
to set uppre-commit
in your development environment. - When you try to
git commit
, pre-commit will run these, and stop the commit if anything fails:- unit tests in
tests/
elm-analyse
static analysis toolelm-format
Elm code formatterelm-review
code linting toolprettier
JavaScript, JSON, and HTML formatter
- unit tests in
- This will catch many common issues long before GitLab's CI pipeline does.
- If you need to bypass this for any reason,
git commit --no-verify
will skip this validation.
- Install
Design Review Process
When solving an issue of weight 5-10, we strongly encourage you to have a design/scoping discussion with others on the project. Consider writing a short implementation plan and posting it as an issue comment.
When solving an issue of weight 20 or higher, we require you to write a step-wise implementation plan, post it as an issue comment, and collect feedback from at least one maintainer. Please do this early, before requesting code review. This could save you many hours of re-work.
Submitting a Contribution
When creating a merge request (MR), please assign it to yourself, and begin the title with Draft:
until you believe it passes the MR Quality Checklist below. Then, remove the Draft:
prefix to mark the MR as ready.
Maintainers are happy to provide guidance, even if your MR is an early draft. Feel free to ask in chat. You can also add someone to the "Reviewers" section to request review from a specific person. (Leave the MR assigned to yourself.)
MRs are generally reviewed within 1-2 working days. An MR should be merged as soon as it is approved by two maintainers, and it has a passing CI pipeline (see below). The two-maintainer rule is occasionally relaxed for periods of decreased maintainer availability.
If your MR fixes one or more issues, please do not close them before your MR is merged. As long as you write (e.g.) fixes #123
in the MR description, the merge will close the issues automatically.
MR Quality Checklist
Maintainers, please ensure every MR passes this checklist before approving, including MRs from new contributors. Consult co-maintainers when making the occasional exception.
Administrative
- MR description is fully populated.
- MR effectively fixes all issues that it claims to fix.
- If not, change the
fixes #123
text in the description (e.g.fixes part of #123
)
- If not, change the
- Follow-up issues are created for any new issues that the MR causes or uncovers.
- If the MR introduces any technical debt, these issues are assigned to MR author, unless they are a first- or second-time contributor.
Quality and Technical Debt
Relax the criteria in this section if this is a contributor's first or second MR, and any technical or UI debt introduced is modest (the fix would fit on about 1 screen of code), and you create a follow-up issue to track it.
- MR does not decrease the overall consistency or polish of Exosphere's UI.
- MR does not decrease Exosphere's overall code quality.
- MR does not use hard-coded representations of any localized strings in the UI.
- If the MR adds/changes padding and spacing, numbers from
spacer
must be used, and the guidelines at "Space" section of design system should be followed.
Functional
- MR does not break existing functionality or behavior that users are likely to care about.
- If the MR adds/changes/removes app flags (in
src/Types/Flags.elm
), then the following are updated accordingly:config.js
- all files in
environment-configs/
(else you may break production sites!) - Documented options in config-options.md
- If the MR adds localized strings (in
src/Types/Defaults.elm
) then the following are updated accordingly:- all files in
environment-configs/
which havelocalization
specified (else you may break production sites!) - Documented options for
Example Localization JSON object
section in config-options.md
- all files in
- If the MR adds/changes/removes any popovers, ensure that their IDs are unique.
Documentation
- If MR significantly changes organization structure of codebase (e.g. modules and directories),
docs/code-tour.md
is updated appropriately. - If the MR adds/changes/removes UI elements in
src/Style/Widgets/
, thensrc/DesignSystem/Explorer.elm
shows example usage of that widget.
The information below is for reference. You don't need to understand it to contribute, but it may be helpful in some situations.
Continuous Integration
Our continuous integration (CI) pipeline runs:
- elm-format (to ensure that contributions comply with the Elm Style Guide)
- prettier (to ensure consistent javascript & html file formatting)
- elm-analyse
- elm-review
- unit tests
- End-to-end tests which exercise the application in real web browsers
You can run all of these but the browser tests locally. The easiest way is to set up husky
(per the section above) and try to git commit
. Or, you can test manually with these commands:
bash
npm install
npm run test
npm run elm:analyse
npm run elm:format
npm run elm:review
npm run js:format
Enabling CI On Your Fork
Optionally, you can enable GitLab CI/CD on your fork project to test the pipeline before submitting a merge request.
- On GitLab, go to your fork's CI/CD settings (at
https://gitlab.com/your-gitlab-username-here/exosphere/edit
) - Expand the "Visibility, project features, permissions" section
- Ensure your Project Visibility is "Public"
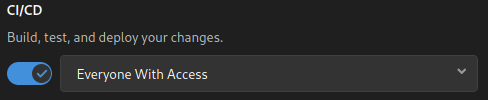
- Enable CI/CD for "Everyone With Access"
- Scroll down and click "Save changes" (it's easy to miss this button)
The CI/CD pipeline should run the next time you push a commit to your fork project on GitLab. Pipeline status should be visible at https://gitlab.com/your-gitlab-username/exosphere/-/pipelines
, and also in any merge request that you submit to the upstream Exosphere project.
End-to-end browser tests
Our CI pipeline also runs end-to-end tests with real browsers. If you are a regular contributor, you can enable browser tests to run from your fork project.
For these tests to work, you will need:
- An ACCESS account (Go to https://access-ci.org and create one)
- Access to the "Exosphere Integration Testing" (INI210003) Jetstream2 allocation. If you do not have access to the INI210003 Jetstream2 allocation, please ask the maintainers.
- A Jetstream2 administrator to set an OpenStack password for your user account
- Set
OS_USERNAME
andOS_PASSWORD
environment variables in the GitLab CI/CD settings of your own fork of Exosphere
Here is how to add OpenStack credentials as environment variables to your GitLab repository settings:
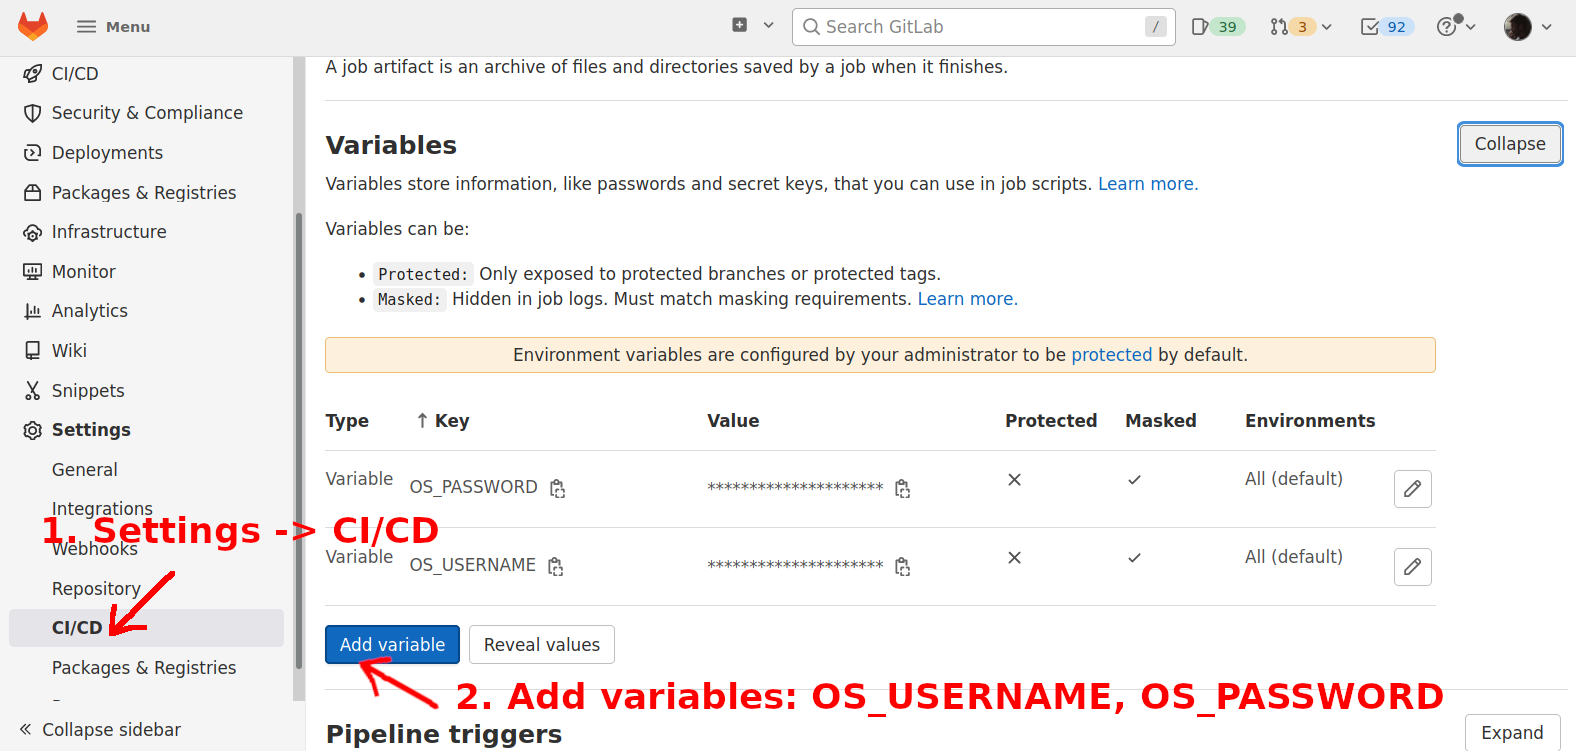
Note that the variables are masked, but not protected.
The next time you push a commit to your fork project, the browser tests should run in the CI pipeline.
Special Branch Behavior
The CI pipeline's end-to-end browser tests have special behavior for master
and dev
branches, as opposed to all other git repository branches.
master
and dev
branches: The CI pipeline deploys Exosphere to production environments (try.exosphere.app and exosphere.jetstream-cloud.org for master branch, try-dev.exosphere.app for dev branch), then runs the tests against these live production environments. If you are working on a fork of exosphere/exosphere
on GitLab, these deploy jobs will not succeed (because you hopefully lack the secrets needed to deploy to production) and the tests may fail as well. So, contributors are encouraged not to work on branches named master
or dev
at this time, even on your own fork of the project.
All other branches: Compiled Exosphere assets from the elm_make
stage are combined with Selenium and a headless browser in a custom container, and the tests point at Exosphere served by this container. (See the .build_with_kaniko
-based jobs in the dockerize
stage.) Browser tests for merge requests run in the test
stage along with the other tests (like Elm unit tests, elm-analyze
, etc.). This is all self-contained within the CI pipeline; it does not use or modify live production environments.
Architecture Decisions
We use lightweight architecture decision records. See: https://adr.github.io/
Our architecture decisions are documented in: docs/adr/README.md